

For some people, buying a used recreational vehicle (RV) is a good way to save money on travel.
However, before purchasing a used RV, paying attention to the vehicle’s details is crucial to avoid buying an RV with accident history, being scammed, or facing costly repair fees that can turn that dream into a financial nightmare.
Hidden water damage, roof leaks, engine problems, and expensive delamination are just a few of the costly surprises waiting for an unprepared buyer. This guide will walk you through exactly what to look for when buying a used RV, from the roof down to the tires, so you can make a confident purchase and start your adventures with peace of mind.
Key Takeaways
- Water damage is the biggest threat to any used RV. Check the roof, walls, and floors for stains, soft spots, and musty smells.
- Test every appliance, including the refrigerator, stove, oven, microwave, water heater, furnace, and air conditioner.
- Run the plumbing system to check for leaks, good pressure, and proper drainage. Ask if the RV was winterized each year.
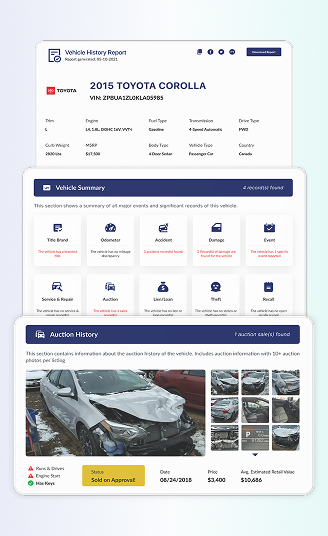
- Run an RV VIN check, and get the vehicle history reports to reveal accidents, salvage titles, theft records, and recalls. Do not skip this step.
Why a Used RV Requires Extra Caution
An RV is a car, a house, and a plumbing system all rolled into one. That means there are three times as many things that can break.
When you buy a used RV, you are not just buying an engine and a transmission. You are buying a roof that must not leak, walls that must not rot, appliances that must work, and holding tanks that must not crack. Water damage is the single biggest threat to any RV, and it can hide behind beautiful wallpaper and fresh caulking.
That is why you need both a physical inspection and a digital one. A used RV buying guide is not complete without talking about the RV VIN number lookup. The reports show recorded accidents, theft records, service & maintenance history, title brands like salvage or rebuilt, and sometimes even the vehicle’s service history. Do not skip it.
The Complete Used RV Inspection Checklist
Let us walk through the most critical areas to inspect. Use this RV inspection checklist as your roadmap. Take your time. Bring a flashlight. And do not be afraid to get on your hands and knees.
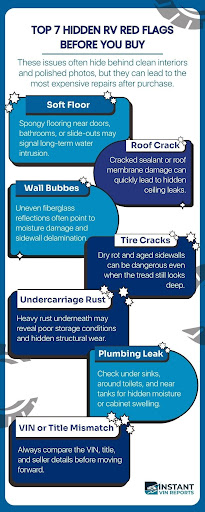
- Inspect the Roof for Damage
A proper RV roof inspection should happen early in the process because roof failures are one of the most common causes of larger structural issues. Even minor roof damage can significantly impact the comfort of your RV. Leaks can allow dirty water and debris to enter, leading to water damage and mold growth, making the interior look unappealing.
What to look for:
- Cracks or gaps in the roof sealant around vents, air conditioners, and antennas.
- Soft spots when you walk on the roof. A spongy feel means the plywood underneath has rotted.
- Bubbles or peeling in the roof membrane (rubber or fiberglass).
- Stains or discoloration on the interior ceiling, especially near corners and fixtures.
Do this inspection on a dry day. If it has rained recently, look for active drips or wet spots inside. If unsure, consider hiring a professional mechanic for a thorough inspection. The mechanic should check the air conditioning and ensure the waterproof seals are intact to prevent leaks.
Read Also: How to Check the VIN Number on a Camper
-
Check for Water Damage and Delamination
If there is one thing to prioritize above everything else, it is RV water damage inspection. Water damage is one of the most expensive and common problems in used RVs. Even a beautiful RV can lose serious value once hidden moisture damage is discovered.
What to look for:
- Bubbling, rippling, or soft spots on the exterior fiberglass walls.
- Discoloration or dark stains on interior walls and ceilings.
- A musty or moldy smell inside the RV. This is a major red flag.
- Soft or spongy floors, especially near doors, windows, and bathrooms.
Delamination repair cost can range from $1,000 to $10,000 or more, depending on how much of the wall needs to be replaced. In severe cases, the damage is permanent, and the RV is essentially totaled.
-
Assess the Tires for Age and Wear
RV tires age out before they wear out. Even if the tread looks good, tires that are more than five or six years old are a safety risk. Blowouts on a heavy RV can cause catastrophic damage to the wheel wells, plumbing, and even the body.
What to check:
- The DOT date code on the tire sidewall. The last four digits tell you the week and year of manufacture. For example, “3520” means the 35th week of 2020.
- Cracks or dry rot on the sidewalls. This is called weather checking and means the rubber is failing.
- Uneven tread wear, which could indicate alignment or suspension problems.
- Low tire pressure. If the seller does not keep the tires inflated, they probably neglected other maintenance too.
-
Assess the Condition of the Floors
Living in a place with a gross floor is not ideal. Inspect the RV’s living room floor to see if anything has leaked or is crooked.
What to do:
- Walk around the entire RV in your socks or thin slippers. Feel for soft spots, dips, or uneven areas.
- Check under rugs and floor mats. Sellers sometimes cover up stains or soft spots.
- Look for discoloration or warping in vinyl flooring.
- Inspect the floor near the bathroom, kitchen, and entry door. These are the most common leak points.
-
Put the Appliances to the Test
In addition to inspecting the RV’s floor condition, remember to test the appliances. This step is just as important as the other steps to ensure the vehicle’s safety. Hence, check and make sure that all of the appliances are working properly before you decide to buy the RV, because faulty appliances can lead to costly repairs and high safety issues.
What to do:
- Turn on the refrigerator and feel the cold air inside. Listen for the compressor or cooling unit to kick on.
- Light the stove burners and the oven. Check for even flame and proper ignition.
- Run the microwave for a minute with a cup of water inside.
- Turn the furnace on and listen for strange noises. Feel warm air coming from the vents.
- Run the air conditioner on both high and low settings.
Test everything on both electric and propane power if the RV has dual fuel capability. Some appliances work on one but not the other.
-
Inspect Plumbing and Holding Tanks
Plumbing leaks can destroy an RV from the inside out. Water gets under floors, behind walls, and into the insulation. By the time you notice a smell or a stain, the damage is extensive.
What to do:
- Fill the fresh water tank and turn on the water pump. Listen for the pump cycling on and off when no water is running. That indicates a leak.
- Run water at every faucet, shower, and toilet. Check for good pressure and hot water.
- Look under sinks and around the water heater for drips or corrosion.
- Open the gray and black tank valves (if the RV is at a dump station or the seller allows it). Check that the valves move smoothly and seal tightly.
A handy tip is to ask the RV owner whether the vehicle has been properly winterized each year. This can help protect the pipes from cold weather.
-
Check the HVAC System’s Functionality
Heating and air conditioning are not luxuries. They are essential for safe and comfortable travel, especially in extreme weather.
What to do:
- Run the furnace and feel for warm air at each vent.
- Run the air conditioner and feel the cold air.
- Listen for unusual noises like grinding, squealing, or rattling.
- Check that the thermostat controls the system properly and maintains the set temperature.
-
Ensure the Water Heater is Operational
A broken water heater ruins a camping trip fast. No one wants cold showers or to wash dishes in freezing water.
What to do:
- Turn on the water heater and let it run for 10 to 15 minutes.
- Check that the water gets hot at the kitchen and bathroom faucets.
- Look for leaks around the water heater compartment, both inside and outside the RV.
- Listen for banging, hissing, or popping sounds that could indicate sediment buildup or a failing heating element.
-
Verify Lights and Electrical Systems
An RV has two electrical systems. The 12 volt DC system runs the lights, water pump, and control boards from the house batteries, and the 120 volt AC system runs the outlets, air conditioner, and microwave when you are plugged into shore power.
What to check:
- Turn on every interior and exterior light. Check that switches work and bulbs are not burned out.
- Plug a phone charger or small device into several outlets to confirm they have power.
- Check the brake lights, turn signals, and headlights. Have someone stand behind the RV while you test.
- Inspect the battery compartment for corrosion, loose cables, or swollen batteries.
- If the RV has a generator, start it up. Let it run for 10 minutes under load (air conditioner or microwave) to confirm it powers the system smoothly.
-
Examine the Interior and Exterior Walls
The interior is the most critical space for the driver and passenger to rest. If there’s any unusual smell in the interior area, be aware of it. It might be a sign of overall damage to the vehicle, and that it is being neglected and mistreated beyond repair.
Additionally, examine the exterior wall closely for signs of corrosion, peeling, or cracks. If the RV isn’t appropriately handled or has ever been involved in an accident, the exterior wall may experience delamination.
What to do:
- Gently pressing the wall to check for soft spots indicating rot, sagging, or water damage is helpful.
- Walking on uneven surfaces like the carpet and investigating what’s behind them is also good.
- Delamination repair expenses can be steep, so scrutinizing the exterior is wise to prevent this financial strain.
Used RV Buying Tips for First Time Buyers
Buying a used RV is different from buying a used car. Here are some tips to keep you safe and negotiate better:
Do an RV VIN Check
Before purchase, always perform an RV VIN check. This helps confirm title history, theft records, accident history, recalls, ownership timeline, and whether the seller’s description matches the vehicle’s actual identity, and adds a layer of confidence beyond the physical inspection.
A clean-looking RV with hidden title issues can become difficult to insure, finance, or resell later. The VIN is where the paperwork tells the truth.
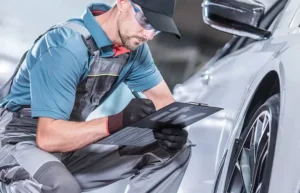
Hire a professional inspector.
A general mechanic knows engines. A certified RV inspector knows roofs, walls, plumbing, and appliances. The cost is typically $500 to $1,000, which is a fraction of what you would pay for a hidden repair.
Do not skip the test drive.
Take the RV on the highway. Feel how it handles. Listen for engine noises, wind noise, and rattles. Check that the cruise control, mirrors, and wipers work.
Negotiate based on the inspection.
Use the findings from your used RV inspection checklist to negotiate the price. A soft spot in the floor or a leaking roof seal are legitimate reasons to ask for a discount or to walk away.
Conclusion
Buying a used RV can be challenging, but it is also a good way to save money. To ensure everything works properly, it is essential to check everything, including the electronic system, interior and exterior, and the appliances installed on the RV.
While a physical inspection is essential, it’s not enough to reveal any hidden damage or whether the RV has a lien or theft records. Be sure to perform an RV VIN lookup to get a full report of the RV’s history and condition to prevent scams and costly future repairs.
Frequently Asked Questions
How to inspect a used RV before buying?
To inspect a used RV before buying, start with exterior walls, roof, tires, and undercarriage, then move inside to inspect water damage, appliances, plumbing, flooring, and VIN history.
What is the average cost of an RV inspection?
A smaller motorhome inspection will cost you roughly $150 for the mechanical system only. If you want to check the interior and exterior, you must pay around $350.
Is it illegal to walk around an RV while driving?
If you are in a state where the passengers are required to put on a seatbelt while the vehicle is moving, you are not allowed to walk around the RV when it’s on the road.
How long can you legally live in the RV?
California’s RV residency laws are relaxed, allowing indefinite stays with responsible behavior, while public lands limit parking to 14 days without a permit.
What is RV delamination?
RV delamination is the separation of the fiberglass outer wall from the structure beneath it, often caused by moisture intrusion.
How to check the RV roof for leaks?
To check the RV roof for leaks, inspect sealant lines, roof vents, AC openings, skylights, ladder mounts, and look for soft decking or stains below roof penetrations.